QA Sphere CLI Tool: Usage
Installation
Prerequisites
- Node.js version 18.0.0 or higher
Installation Methods
-
Via NPX Simply run
npx qas-cli. On first use, you'll need to agree to download the package. You can usenpx qas-cliin all contexts instead of theqaspherecommand.Verify installation:
npx qas-cli --version -
Via NPM
npm install -g qas-cliVerify installation:
qasphere --version
Configuration
The QAS CLI requires two environment variables to function properly:
QAS_TOKEN- QA Sphere API tokenQAS_URL- Base URL of your QA Sphere instance (e.g.,https://qas.eu2.qasphere.com)
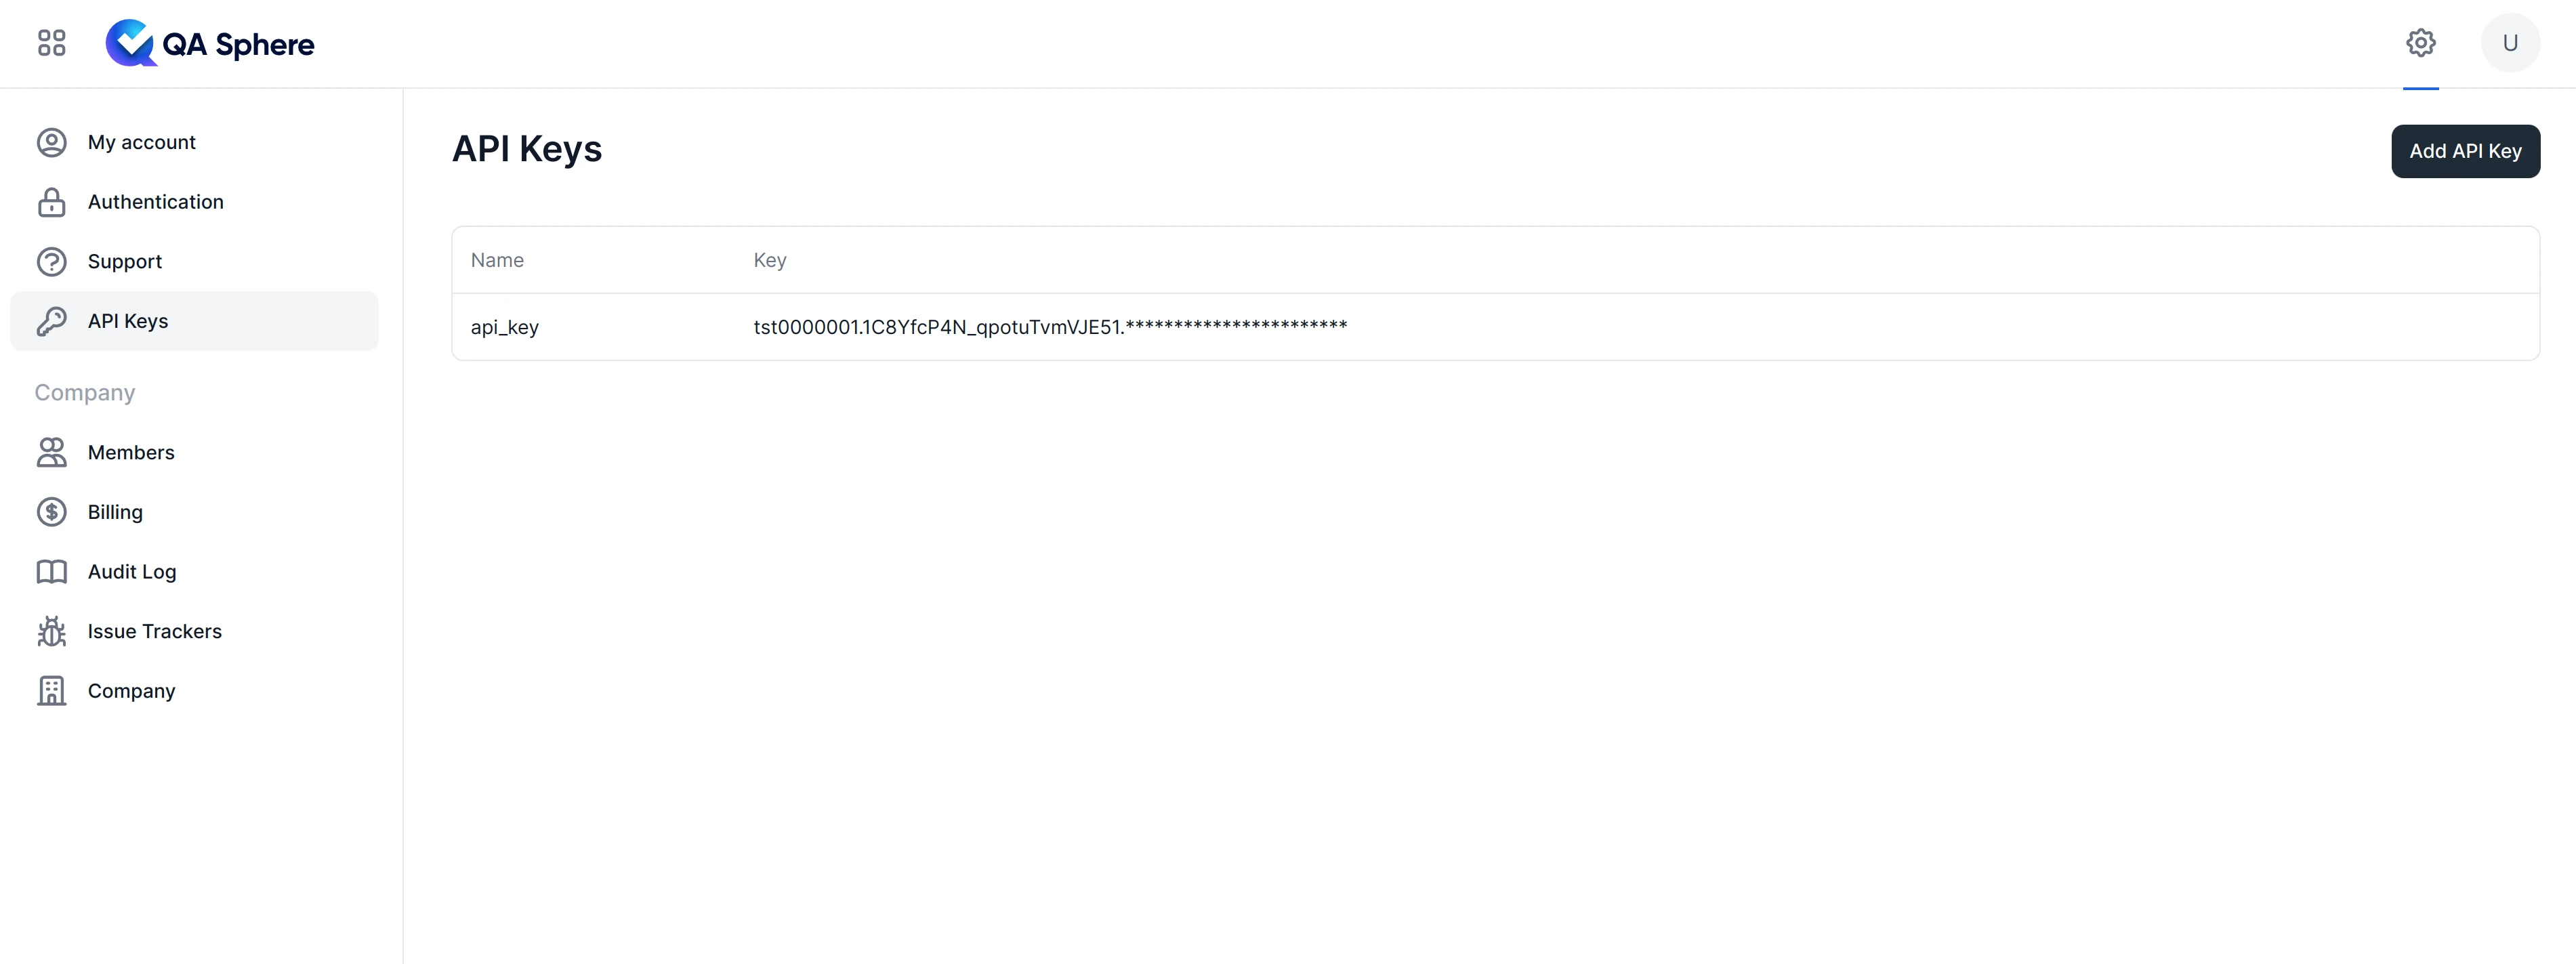
You can create your API key under the QA Sphere settings.
To do that:
- Go to Settings by clicking the gear icon
 in the top right corner.
 - Click API Keys
- Click Create API Key and generate one
These variables can be defined in several ways:
-
Environment Variables: Export them in your shell:
export QAS_TOKEN=your_token_here
export QAS_URL=your_qas_url -
.envFile: Place a.envfile in the current working directory:# .env
QAS_TOKEN=your_token
QAS_URL=your_qas_url -
Configuration File: Create a
.qasphereclifile in your project directory or any parent directory:# .qaspherecli
QAS_TOKEN=your_token
QAS_URL=your_qas_url
# Example with real values:
# QAS_TOKEN=tst0000001.1CKCEtest_JYyckc3zYtest.dhhjYY3BYEoQH41e62itest
# QAS_URL=https://qas.eu1.qasphere.com
Using the junit-upload Command
The junit-upload command is used to upload JUnit XML test results to QA Sphere. The command will automatically create a new test run if no run URL is provided, or upload to an existing run if a run URL is specified.
Basic Syntax
# Create new test run automatically
qasphere junit-upload <path-to-junit-xml>

# Upload to existing test run
qasphere junit-upload -r <run-url> <path-to-junit-xml>
Options
-r, --run-url: Optional URL of the QA Sphere test run. If not provided, a new test run will be created automatically--attachments: Upload detected attachments with test results--force: Ignore errors and continue uploading
Examples
-
Create a new test run automatically and upload results:
qasphere junit-upload ./path/to/junit.xml -
Upload to an existing test run:
qasphere junit-upload -r https://qas.eu1.qasphere.com/project/P1/run/23 ./path/to/junit.xml -
Create a new test run and upload multiple XML files:
qasphere junit-upload ./*.xml -
Upload multiple XML files to an existing test run:
qasphere junit-upload --run-url https://qas.eu1.qasphere.com/project/P1/run/23 ./*.xml -
Create a new test run and upload with attachments:
qasphere junit-upload --attachments ./junit.xml -
Upload with attachments to an existing test run:
qasphere junit-upload -r https://qas.eu1.qasphere.com/project/P1/run/23 --attachments ./junit.xml
Test Case Marker Requirements
To ensure successful mapping of test results to QA Sphere test cases, your automated tests should include a QA Sphere test case marker.
A marker uses the format PROJECT-SEQUENCE (e.g., PRJ-003), where:
PROJECTis your QA Sphere project code.SEQUENCEis the unique sequence number of the test case within the project.
This marker allows the CLI tool to correctly associate an automated test result with its corresponding test case in QA Sphere. Markers are used for searching and are displayed prominently in the QA Sphere Web UI.
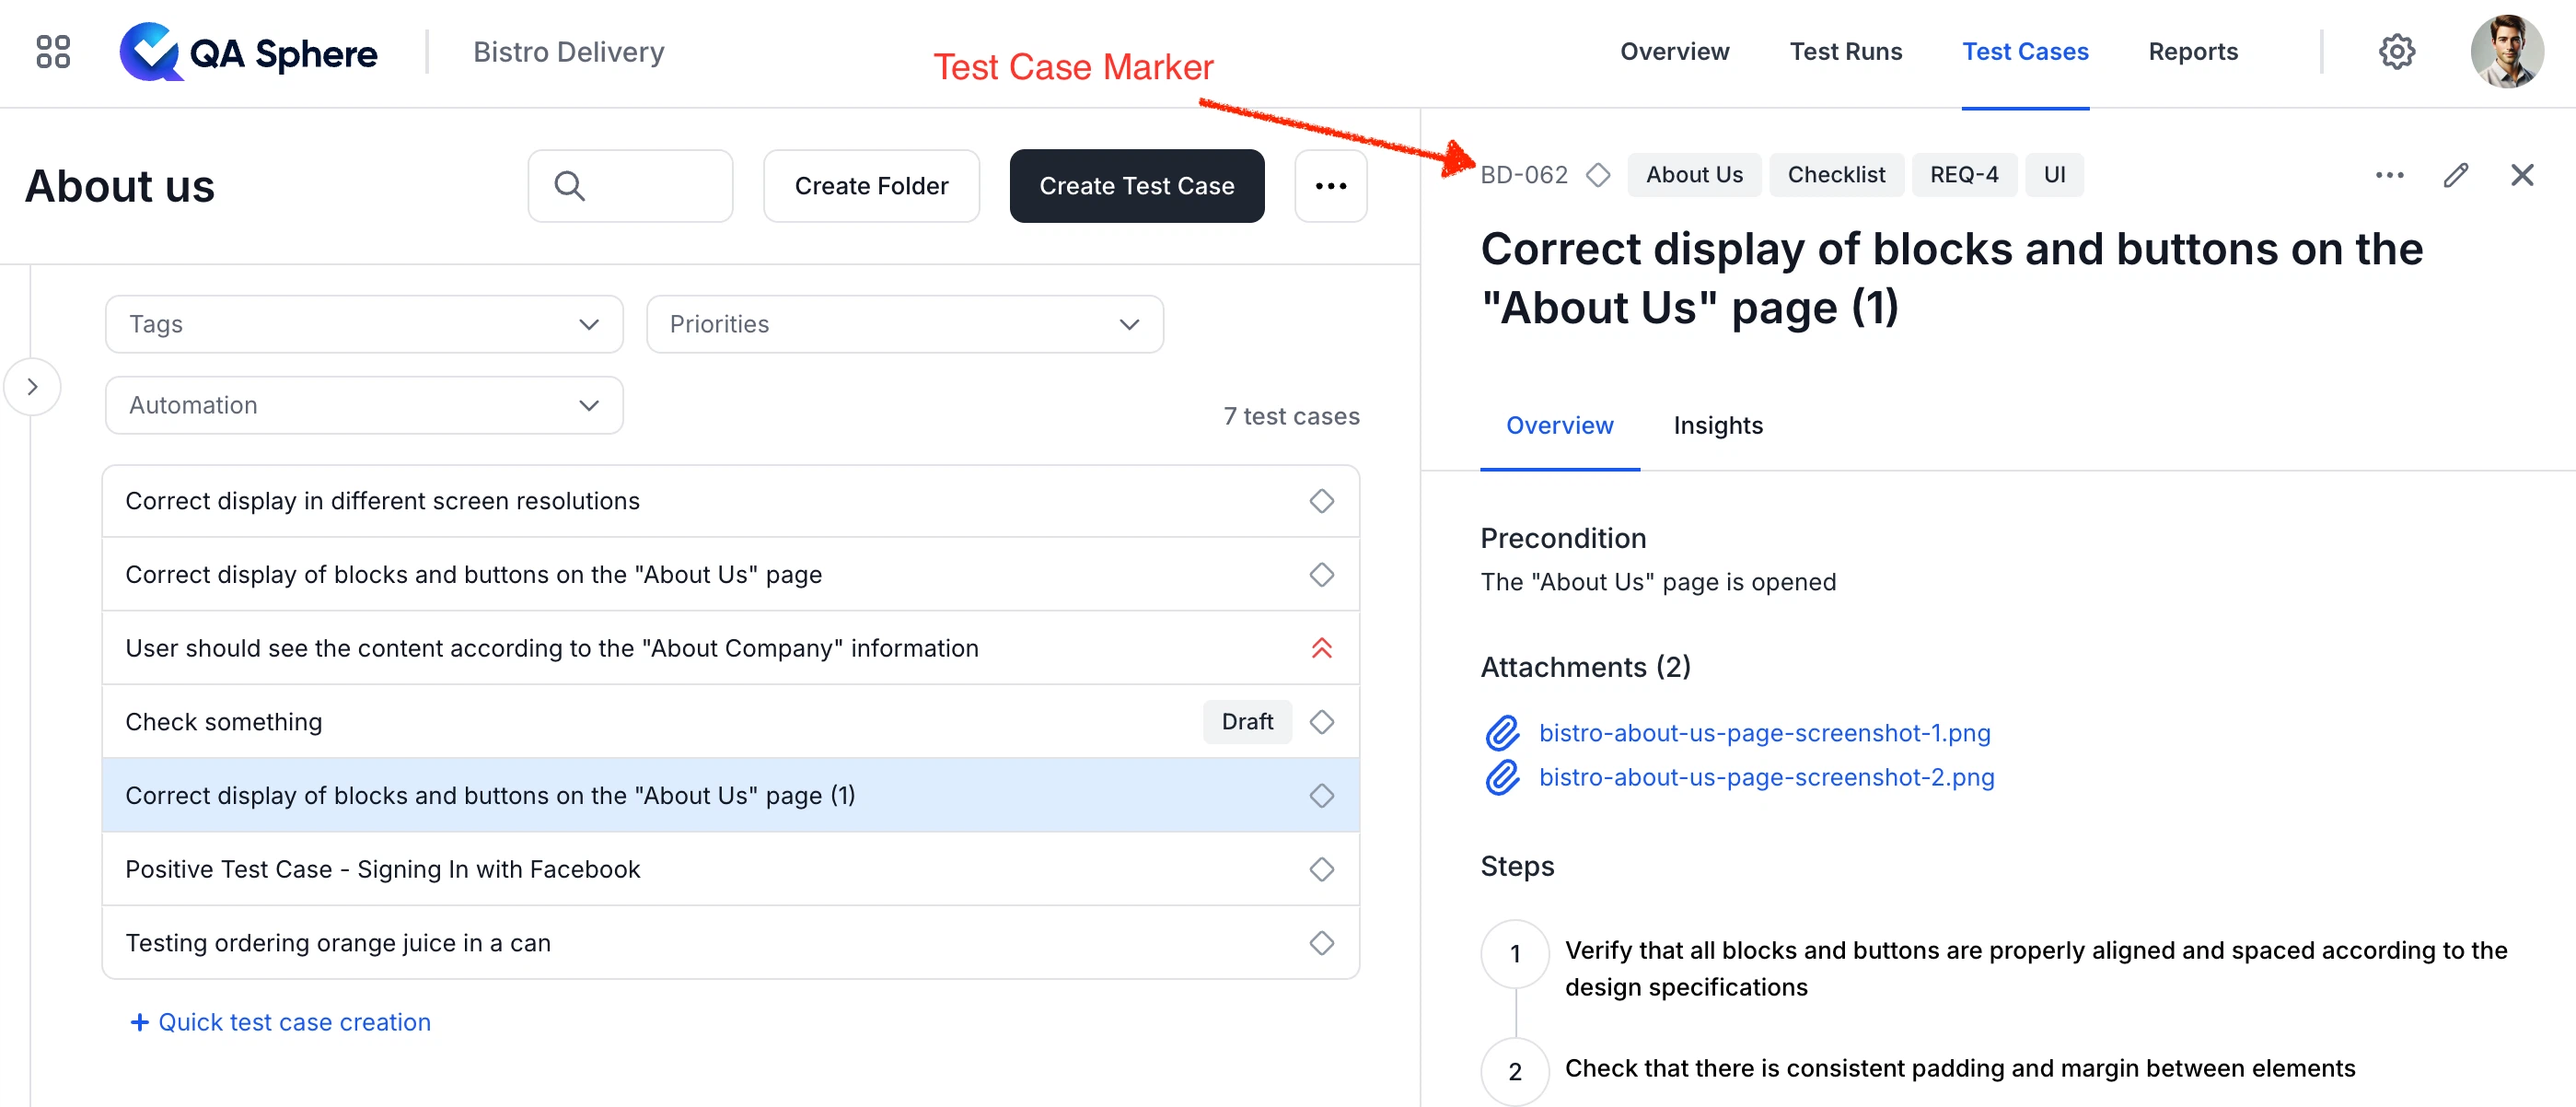
The marker should be included in the name or description of your test case within your test automation framework.
Examples of valid test case names including a marker:
PRJ-312: Login with valid credentialsLogin with valid credentials: PRJ-312
Troubleshooting
For help with any command, use the -h flag:
qasphere junit-upload -h
Ensure your JUnit XML contains matching test case markers to avoid upload errors.
By following these guidelines, you can effectively use the QAS CLI tool to integrate your automated test results with QA Sphere, streamlining your test management process.