The QA Sphere CLI is open source: github.com/hypersequent/qas-cli
Track development, report issues, and contribute on GitHub.
QA Sphere CLI Tool: WebdriverIO Integration
This guide shows you how to integrate WebdriverIO test results with QA Sphere using the QAS CLI tool, based on the Bistro Delivery E2E testing project example.
Installation
Prerequisites
- Node.js version 18.0.0 or higher (Node.js 20+ recommended for WebdriverIO)
- WebdriverIO test project
Installation Methods
-
Via NPX (Recommended) Simply run
npx qas-cli. On first use, you'll need to agree to download the package. You can usenpx qas-cliin all contexts instead of theqaspherecommand.Verify installation:
npx qas-cli --version -
Via NPM
npm install -g qas-cliVerify installation:
qasphere --version
Configuration
The QAS CLI requires two environment variables to function properly:
QAS_TOKEN- QA Sphere API tokenQAS_URL- Base URL of your QA Sphere instance (e.g.,https://qas.eu2.qasphere.com)
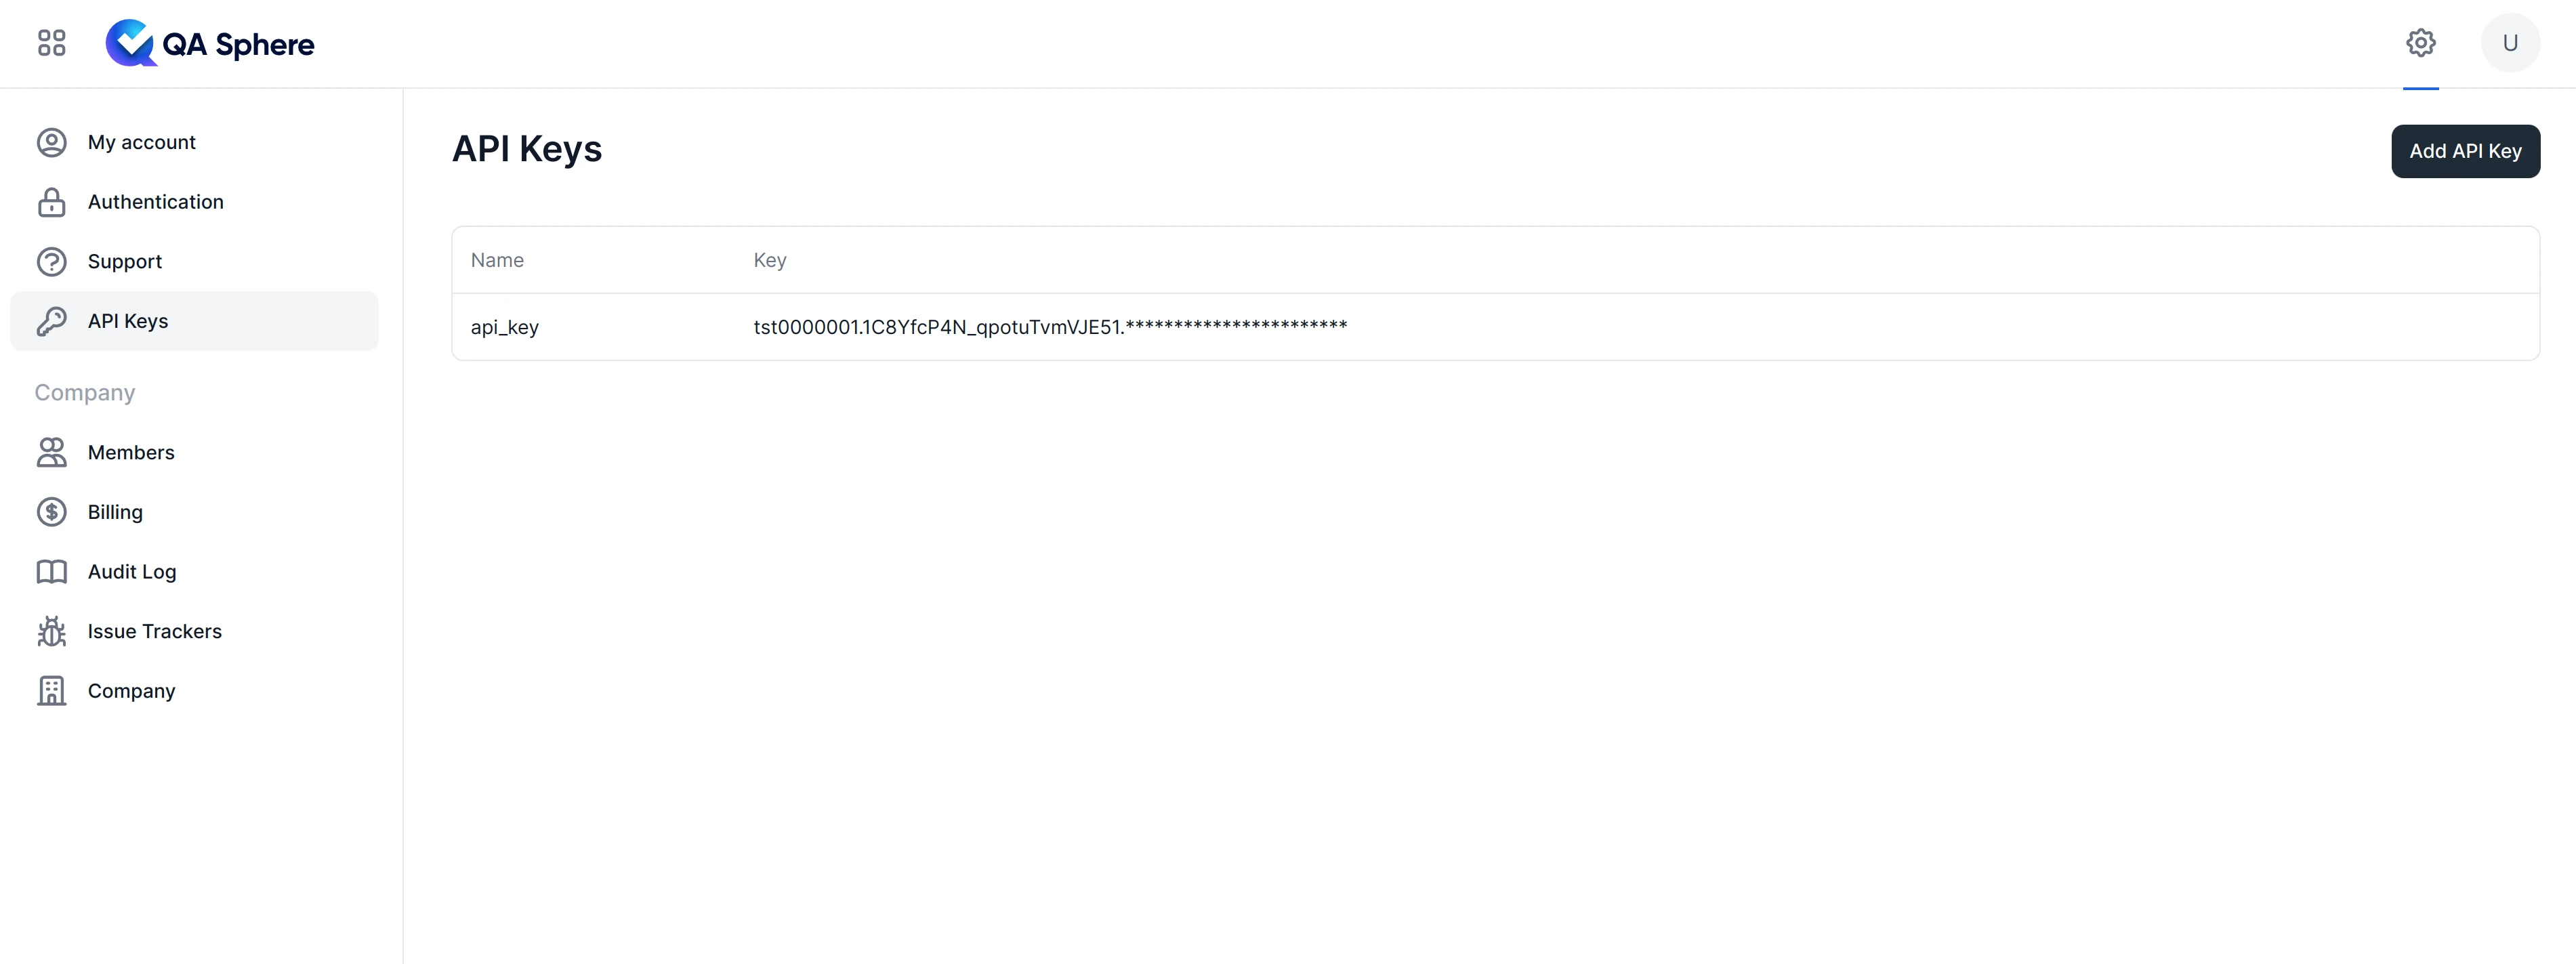
You can create your API key under the QA Sphere settings.
To do that:
- Go to Settings by clicking the gear icon
 in the top right corner.
 - Click API Keys
- Click Create API Key and generate one

These variables can be defined in several ways:
-
Environment Variables: Export them in your shell:
export QAS_TOKEN=your_token_here
export QAS_URL=your_qas_url -
.envFile: Place a.envfile in the current working directory:# .env
QAS_TOKEN=your_token
QAS_URL=your_qas_url -
Configuration File: Create a
.qasphereclifile in your project directory or any parent directory:# .qaspherecli
QAS_TOKEN=your_token
QAS_URL=your_qas_url
# Example with real values:
# QAS_TOKEN=tst0000001.1CKCEtest_JYyckc3zYtest.dhhjYY3BYEoQH41e62itest
# QAS_URL=https://qas.eu1.qasphere.com
WebdriverIO Configuration
To generate JUnit XML reports from WebdriverIO, configure the JUnit reporter in your wdio.conf.ts:
// wdio.conf.ts
import type { Options } from '@wdio/types';

export const config: Options.Testrunner = {
  // ... other config

  reporters: [
    ['junit', {
      outputDir: './junit-results',
      outputFileFormat: (options) => `results-${options.cid}-${options.capabilities.browserName}.xml`,
      suiteNameFormat: /[^a-zA-Z0-9@\-:]+/  // Keeps alphanumeric, @, dash, colon
    }]
  ],

  // ... rest of config
};
Key Configuration Points
- JUnit Reporter: The
junitreporter generates XML files that QA Sphere can process - Output Directory: Specify a consistent output directory (e.g.,
./junit-results) - Output File Format: WebdriverIO generates separate JUnit XML files per worker (e.g.,
results-0-0.xml,results-0-1.xml) - Suite Name Format: Configure to preserve test case IDs in test names
Multiple Worker Support
WebdriverIO generates separate JUnit XML files per worker (e.g., results-0-0.xml, results-0-1.xml). When uploading, you must list all files explicitly - glob patterns are not supported:
# List all files explicitly
npx qas-cli junit-upload junit-results/results-0-0.xml junit-results/results-0-1.xml
Note: The CLI does not support glob patterns. All JUnit XML files must be listed individually. You can use shell expansion in your terminal, or create an npm script that lists the files explicitly.
Using the junit-upload Command
The junit-upload command is used to upload JUnit XML test results to QA Sphere. The command will automatically create a new test run if no run URL is provided, or upload to an existing run if a run URL is specified.
Basic Syntax
# Create new test run automatically
qasphere junit-upload <path-to-junit-xml>

# Upload to existing test run
qasphere junit-upload -r <run-url> <path-to-junit-xml>
Options
-r, --run-url: Optional URL of the QA Sphere test run. If not provided, a new test run will be created automatically--attachments: Upload detected attachments with test results (screenshots)--skip-report-stdout on-success: Hide verbose JUnit report output for passing tests--force: Ignore errors and continue uploading
WebdriverIO-Specific Examples
-
Create a new test run and upload all worker results:
# Run WebdriverIO tests
npm test

# Upload all JUnit XML files (one per worker) - list files explicitly
npx qas-cli junit-upload junit-results/results-0-0.xml junit-results/results-0-1.xml -
Upload to an existing test run:
npx qas-cli junit-upload -r https://qas.eu1.qasphere.com/project/BD/run/23 junit-results/results-0-0.xml junit-results/results-0-1.xml -
Upload with attachments and clean output:
npx qas-cli junit-upload --attachments --skip-report-stdout on-success junit-results/results-0-0.xml junit-results/results-0-1.xml
NPM Script Integration
Add a convenient script to your package.json:
{
  "scripts": {
    "test": "wdio run wdio.conf.ts",
    "test:headed": "wdio run wdio.conf.ts --headed",
    "junit-upload": "npx qas-cli junit-upload --attachments --skip-report-stdout on-success junit-results/results-0-0.xml junit-results/results-0-1.xml"
  }
}
Note: If you have a variable number of worker files, you can create a simple Node.js script to dynamically find and list all result files. Create scripts/upload-junit.js:
// scripts/upload-junit.js
const { execSync } = require('child_process');
const fs = require('fs');
const path = require('path');

const resultsDir = './junit-results';
const files = fs.readdirSync(resultsDir)
  .filter(file => file.startsWith('results-') && file.endsWith('.xml'))
  .map(file => path.join(resultsDir, file));

if (files.length === 0) {
  console.error('No JUnit XML files found in', resultsDir);
  process.exit(1);
}

const command = `npx qas-cli junit-upload --attachments --skip-report-stdout on-success ${files.join(' ')}`;
execSync(command, { stdio: 'inherit' });
Then update your package.json:
{
  "scripts": {
    "junit-upload": "node scripts/upload-junit.js"
  }
}
This approach works cross-platform (Windows, macOS, Linux).
Then run:
npm test
npm run junit-upload
Why this approach?
- No version pinning: Using
npx qas-cliensures you always get the latest version - Convenience: A simple
npm run junit-uploadis easier to remember - CI/CD friendly: The script can be easily integrated into GitHub Actions, GitLab CI, or other pipelines
- Team consistency: Everyone runs the same command with the same flags
- Clean output:
--skip-report-stdout on-successkeeps QA Sphere test results cleaner by hiding verbose output for passing tests
Test Case Marker Requirements
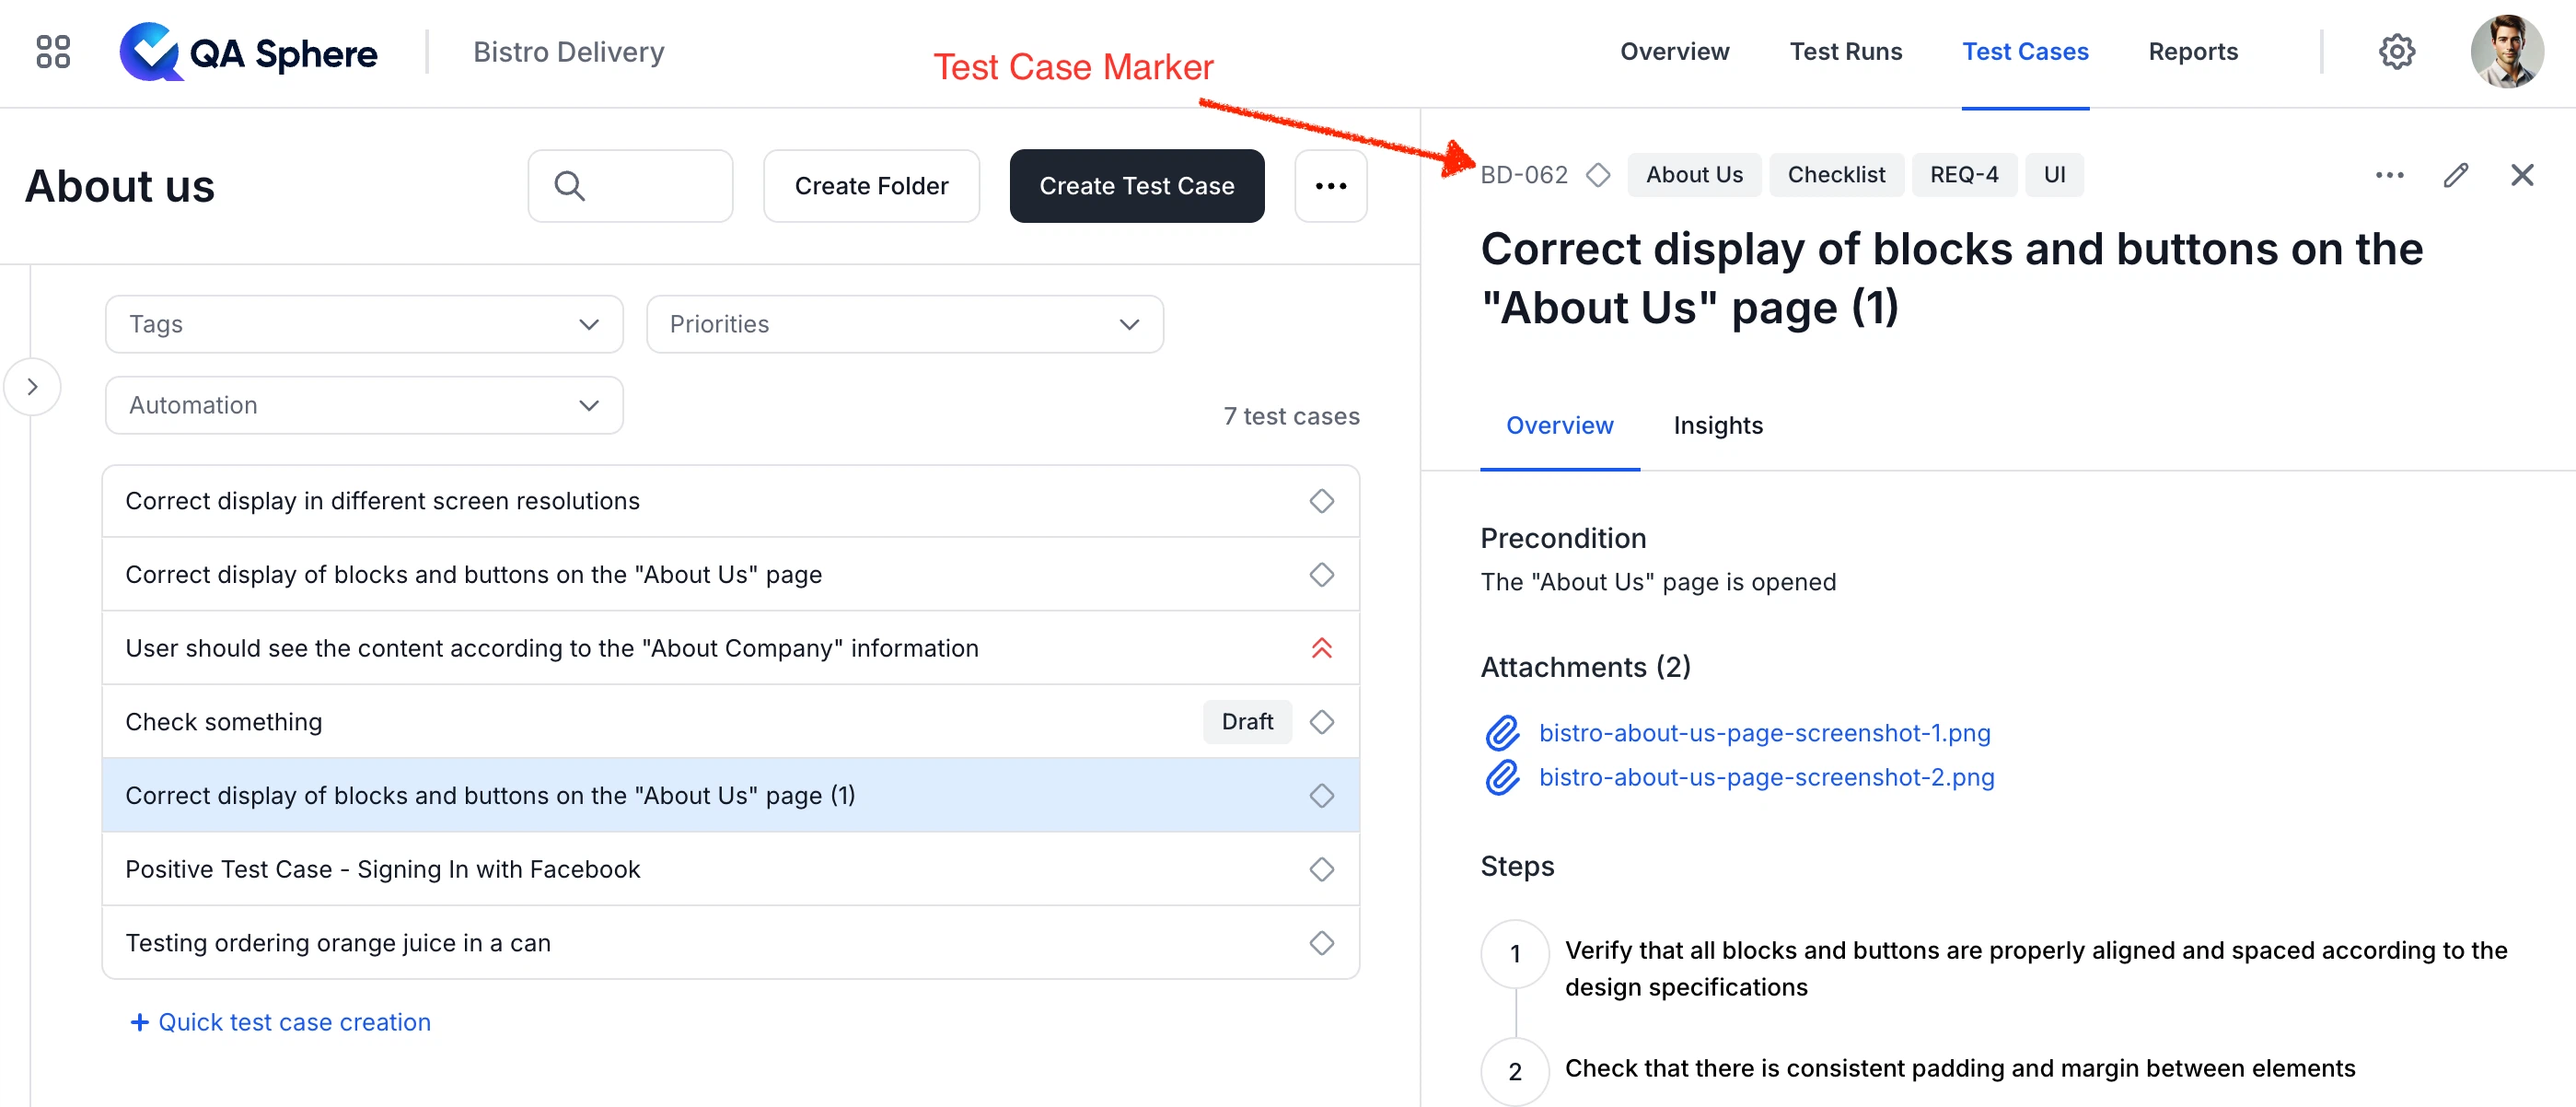
To ensure successful mapping of test results to QA Sphere test cases, your WebdriverIO tests should include a QA Sphere test case marker.
A marker uses the format PROJECT-SEQUENCE (e.g., BD-023), where:
PROJECTis your QA Sphere project code.SEQUENCEis the unique sequence number of the test case within the project.
This marker allows the CLI tool to correctly associate an automated test result with its corresponding test case in QA Sphere. Markers are used for searching and are displayed prominently in the QA Sphere Web UI.

WebdriverIO Test Examples with Markers
// test/specs/cart-simple.e2e.ts
import { describe, it } from 'mocha';

describe('Cart Functionality', () => {
  it('BD-023: User should see product list on checkout page', async () => {
    // Test implementation
    await browser.url('/checkout');
    const products = await $$('.product-item');
    expect(products.length).toBeGreaterThan(0);
  });

  it('BD-022: Order placement with valid data', async () => {
    // Test implementation
    await browser.url('/checkout');
    await $('#name').setValue('John Doe');
    await $('#email').setValue('[email protected]');
    await $('button[type="submit"]').click();
    await expect($('.success-message')).toBeDisplayed();
  });
});
The marker should be included at the start of your test name. Examples of valid test case names:
BD-023: User should see product list on checkout pageBD-022: Order placement with valid data
Screenshot Attachments
WebdriverIO can automatically capture screenshots for failed tests. The --attachments flag will automatically detect and upload these screenshots to QA Sphere.
Automatic Screenshot Capture
Implement automatic screenshot attachment in your wdio.conf.ts using the afterTest hook:
// wdio.conf.ts
import fs from 'fs/promises';

export const config: Options.Testrunner = {
  // ... other config

  afterTest: async function (test, context, { error, passed }) {
    if (!passed) {
      // 1. Normalize test name for file matching
      const testNamePrefix = test.title
        .replace(/[^a-zA-Z0-9]+/g, "_")
        .substring(0, 50);

      // 2. Take final screenshot
      const timestamp = new Date().toISOString().replace(/[:.]/g, "-");
      const finalScreenshot = `./screenshots/${testNamePrefix}_afterTest_${timestamp}.png`;
      await browser.saveScreenshot(finalScreenshot);

      // 3. Find all matching screenshots (including inline ones)
      const screenshotFiles = await fs.readdir("./screenshots");
      const matchingScreenshots = screenshotFiles.filter((file) => {
        const testCaseMatch = test.title.match(/^(BD-\d+)/);
        const testCaseId = testCaseMatch ? testCaseMatch[1] : null;
        return file.startsWith(testNamePrefix) || (testCaseId && file.includes(testCaseId));
      });

      // 4. Attach to JUnit XML via error message
      if (error && matchingScreenshots.length > 0) {
        const attachments = matchingScreenshots
          .map((file) => `[[ATTACHMENT|${file}]]`)
          .join("\n");
        error.message = `${error.message}\n\n${attachments}`;
      }
    }
  },

  // ... rest of config
};
How Screenshot Attachments Work
- Automatic capture: When a test fails, the
afterTesthook captures a final screenshot - Multiple screenshots: Collects all screenshots matching the test name prefix (including any taken during the test)
- JUnit XML embedding: Attaches screenshots using the
[[ATTACHMENT|path]]format that QA Sphere CLI recognizes - Pattern matching: Matches screenshots by:
- Test name prefix (normalized:
BD_023_User_should_see_product_list...) - Test case ID (e.g.,
BD-055)
- Test name prefix (normalized:
Why This Approach?
- Zero configuration: Works automatically for all tests without extra code
- Multiple screenshots: Supports both automatic (
afterTest) and manual screenshots taken during tests - QA Sphere integration: The
[[ATTACHMENT|path]]format is recognized byqas-cli junit-upload --attachments - Pattern flexibility: Matches screenshots by test name or test case ID for robust detection
Manual Screenshots During Tests
You can also take manual screenshots during your tests:
it('BD-055: About Us page content validation', async () => {
  await browser.url('/about');

  // Take a manual screenshot
  await browser.saveScreenshot('./screenshots/BD-055_manual_before_check.png');

  // Your test logic
  const content = await $('.about-content').getText();
  expect(content).toContain('About Us');
});
Both manual and automatic screenshots will be collected and uploaded when using the --attachments flag.
Known Limitation
This approach only works for failed tests because it embeds screenshot paths in the error message. JUnit XML doesn't provide a standard way to attach files to successful tests - the <error> or <failure> elements are required to include the attachment metadata.
Complete Example Workflow
Here's a complete example based on the Bistro Delivery E2E testing project:
Project Structure
bistro-e2e-webdriver/
├── test/
│   └── specs/
│       ├── cart-simple.e2e.ts
│       └── contents.e2e.ts
├── wdio.conf.ts
├── package.json
└── .env
Running Tests and Uploading Results
# 1. Set up environment variables (or use .env file)
export QAS_TOKEN=your_token_here
export QAS_URL=https://qas.eu1.qasphere.com

# 2. Run WebdriverIO tests
npm test              # Run tests in headless mode
# or
npm run test:headed   # Run tests with browser visible

# 3. Upload results to QA Sphere
npm run junit-upload
Test Coverage Example
The test suite includes test cases mapped to QA Sphere:
Cart functionality (test/specs/cart-simple.e2e.ts):
BD-023: Product list validation on checkout pageBD-022: Order placement with valid data
Content display (test/specs/contents.e2e.ts):
BD-055: About Us page content validationBD-026: Navbar display across pagesBD-038: Default menu tab (Pizzas)BD-052: Welcome banner and menu button
WebdriverIO generates separate JUnit XML files per worker (e.g., results-0-0.xml, results-0-1.xml) with test case IDs preserved.
Troubleshooting
Common Issues
-
JUnit XML files not found
Error: File not found: junit-results/results-0-0.xmlSolution:
- Ensure WebdriverIO is configured with the JUnit reporter
- Check the output directory matches your upload command
- List all files explicitly (glob patterns are not supported)
- Verify the files exist before running the upload command
-
Test cases not matching
- Ensure your test names include the marker format (e.g.,
BD-023: Test name) - Verify the marker matches an existing test case in QA Sphere
- Check that the project code in the marker matches your QA Sphere project
- Ensure your test names include the marker format (e.g.,
-
Screenshots not uploading
- Verify
--attachmentsflag is included - Check that screenshots are being generated (configure
afterTesthook inwdio.conf.ts) - Ensure screenshot paths in JUnit XML are relative to the working directory
- Verify the
[[ATTACHMENT|path]]format is correctly embedded in error messages
- Verify
-
Multiple worker files
- List all JUnit XML files explicitly (glob patterns are not supported)
- Example:
npx qas-cli junit-upload junit-results/results-0-0.xml junit-results/results-0-1.xml - Ensure all workers complete before running the upload command
- Consider using an npm script or shell script to dynamically list files if the number of workers varies
Getting Help
For help with any command, use the -h flag:
qasphere junit-upload -h
Or with NPX:
npx qas-cli junit-upload -h
By following these guidelines, you can effectively integrate your WebdriverIO test results with QA Sphere, streamlining your test management process.